
Screen guides
Every button explained
Each screen of BBZ Catalog with its parts numbered, and what each one does. The pictures are from a demo catalog.
AI Catalog
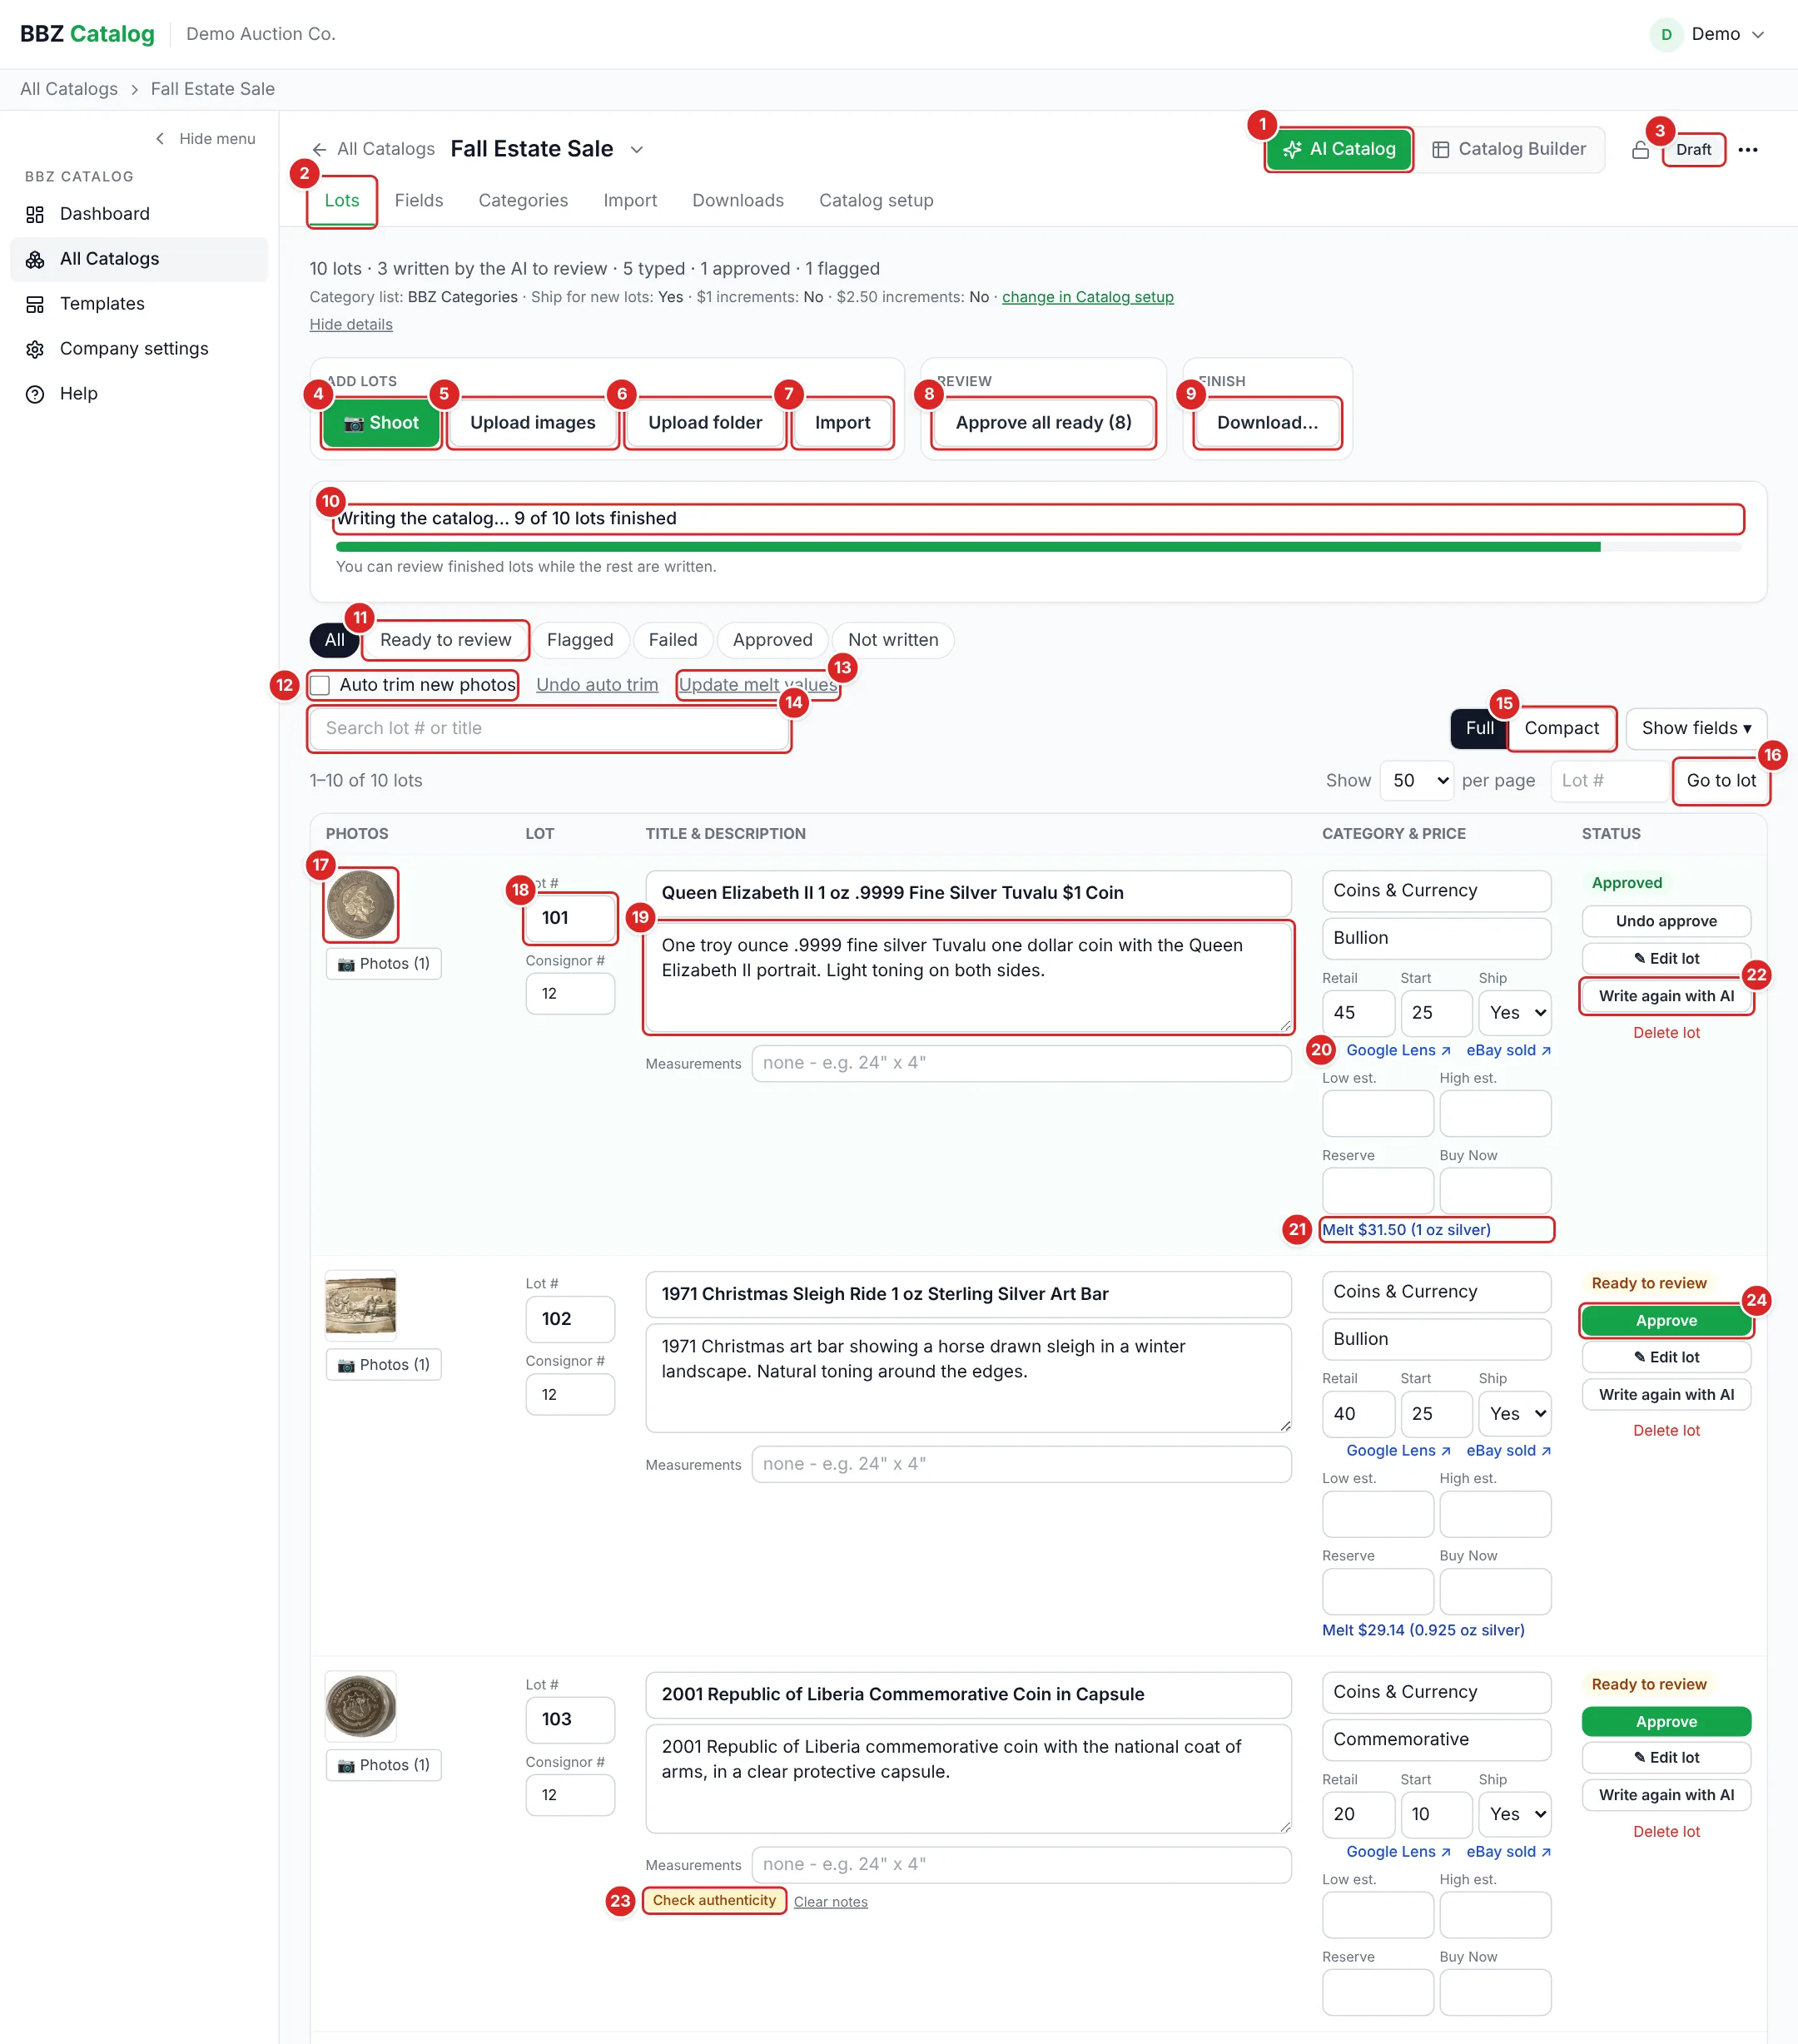
Click the picture to see it full size.
- 1AI Catalog | Catalog Builder - two views of the same catalog and the same lots. Switch any time.
- 2Catalog tabs - Lots, Fields, Categories, Import, Downloads and Catalog setup for this catalog.
- 3Status and ⋯ menu - Draft or Published. The ⋯ menu has Publish, Duplicate catalog, Save as template and Archive.
- 4Shoot - opens the phone page to photograph the sale lot by lot (see the Shoot guide).
- 5Upload images - photos named by lot number (120_1.jpg, 120_2.jpg …). Lots that do not exist yet are added. With "Start writing the lots as soon as the photos are uploaded" ticked, the AI writes them when all are in.
- 6Upload folder - a whole folder: numbered photos, or camera photos with slates. The lots are made and the AI writes them after the upload. Photos whose names a lot has already are left alone (it says so).
- 7Import - lots from a spreadsheet (CSV or Excel).
- 8Approve all ready - approves every lot the AI has finished (the number in brackets).
- 9Download… - the spreadsheet for BBZ, HiBid and other sites, the photo ZIP, or a catalog to print.
- 10Progress - how many lots the AI has finished. You can review finished lots while the rest are written.
- 11Show - All, Ready to review, Flagged, Failed, Approved, Not written.
- 12Auto trim new photos - new item photos are cut down to the item. Undo auto trim takes it off again. The same switch is on the Shoot page.
- 13Update melt values - coins: works out the melt value again at today’s gold and silver price. No AI; Retail and Start stay.
- 14Search - by lot number or a word in the title.
- 15Full / Compact and Show fields - how much of each lot is shown.
- 16Per page and Go to lot - jump straight to a lot number.
- 17Photo - click it to see it large (‹ Lot and Lot › step through the lots; Edit opens the photo editor). Photos (1) adds, orders or deletes photos.
- 18Lot # and Consignor #
- 19Title and description - type to change them; it saves by itself. Measurements below.
- 20Google Lens and eBay sold - look the item up in a new tab.
- 21Melt - coins: the metal value at your gold or silver price.
- 22Write again with AI - the AI writes the lot again from its photos (it asks first). A lot the AI has not written shows Write with AI.
- 23Flag - something to check, like Check authenticity. Clear notes deletes the notes.
- 24Approve - marks the lot as checked. Also Edit lot (the full lot page) and Delete lot.
Shoot on the phone
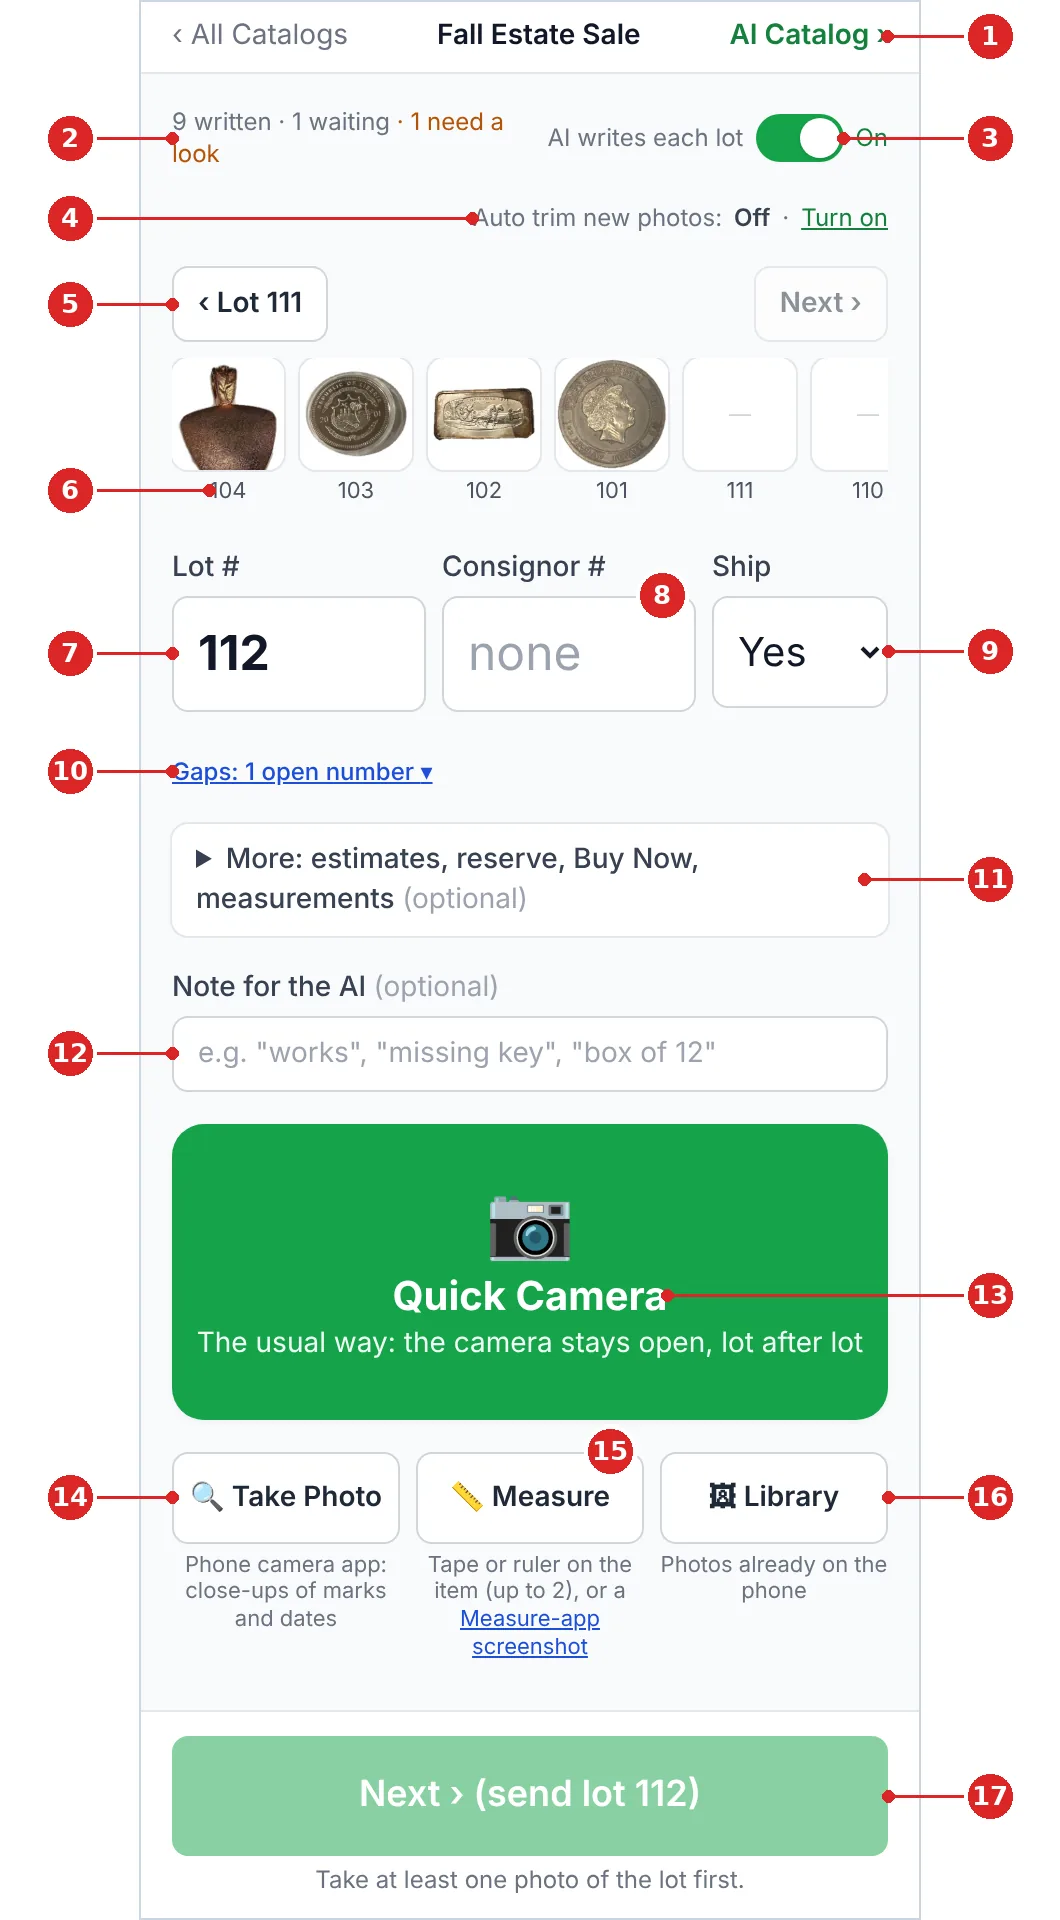
Click the picture to see it full size.
- 1AI Catalog › - the catalog’s AI Catalog page, to review what the AI wrote.
- 2Counts - written, waiting for the AI, and lots that need a look.
- 3AI writes each lot - On: Next sends the lot to the AI. Off: lots are saved as Typed (write them later).
- 4Auto trim new photos - On or Off for this catalog; tap Turn on / Turn off.
- 5‹ Lot and Next › - go back to an earlier lot to change it, and forward again.
- 6Last lots - the lots just shot; tap one to open it.
- 7Lot # - the next number is filled in.
- 8Consignor # - stays the same from lot to lot until you change it.
- 9Ship - stays the same until you change it.
- 10Gaps - lot numbers you skipped; tap one to fill it.
- 11More - estimates, reserve, Buy Now and typed measurements (optional, cleared after each lot).
- 12Note for the AI - for example "works", "missing key", "signed by the artist".
- 13Quick Camera - the camera stays open: tap for each photo, then Next lot.
- 14Take Photo - the phone’s own camera app, best for close-ups of marks and dates.
- 15Measure - a photo with a tape or ruler on the item (up to 2), or a Measure-app screenshot. The AI reads the size.
- 16Library - photos already on the phone.
- 17Next › (send lot) - saves the lot, sends it to the AI and starts the next lot.
Catalog Builder
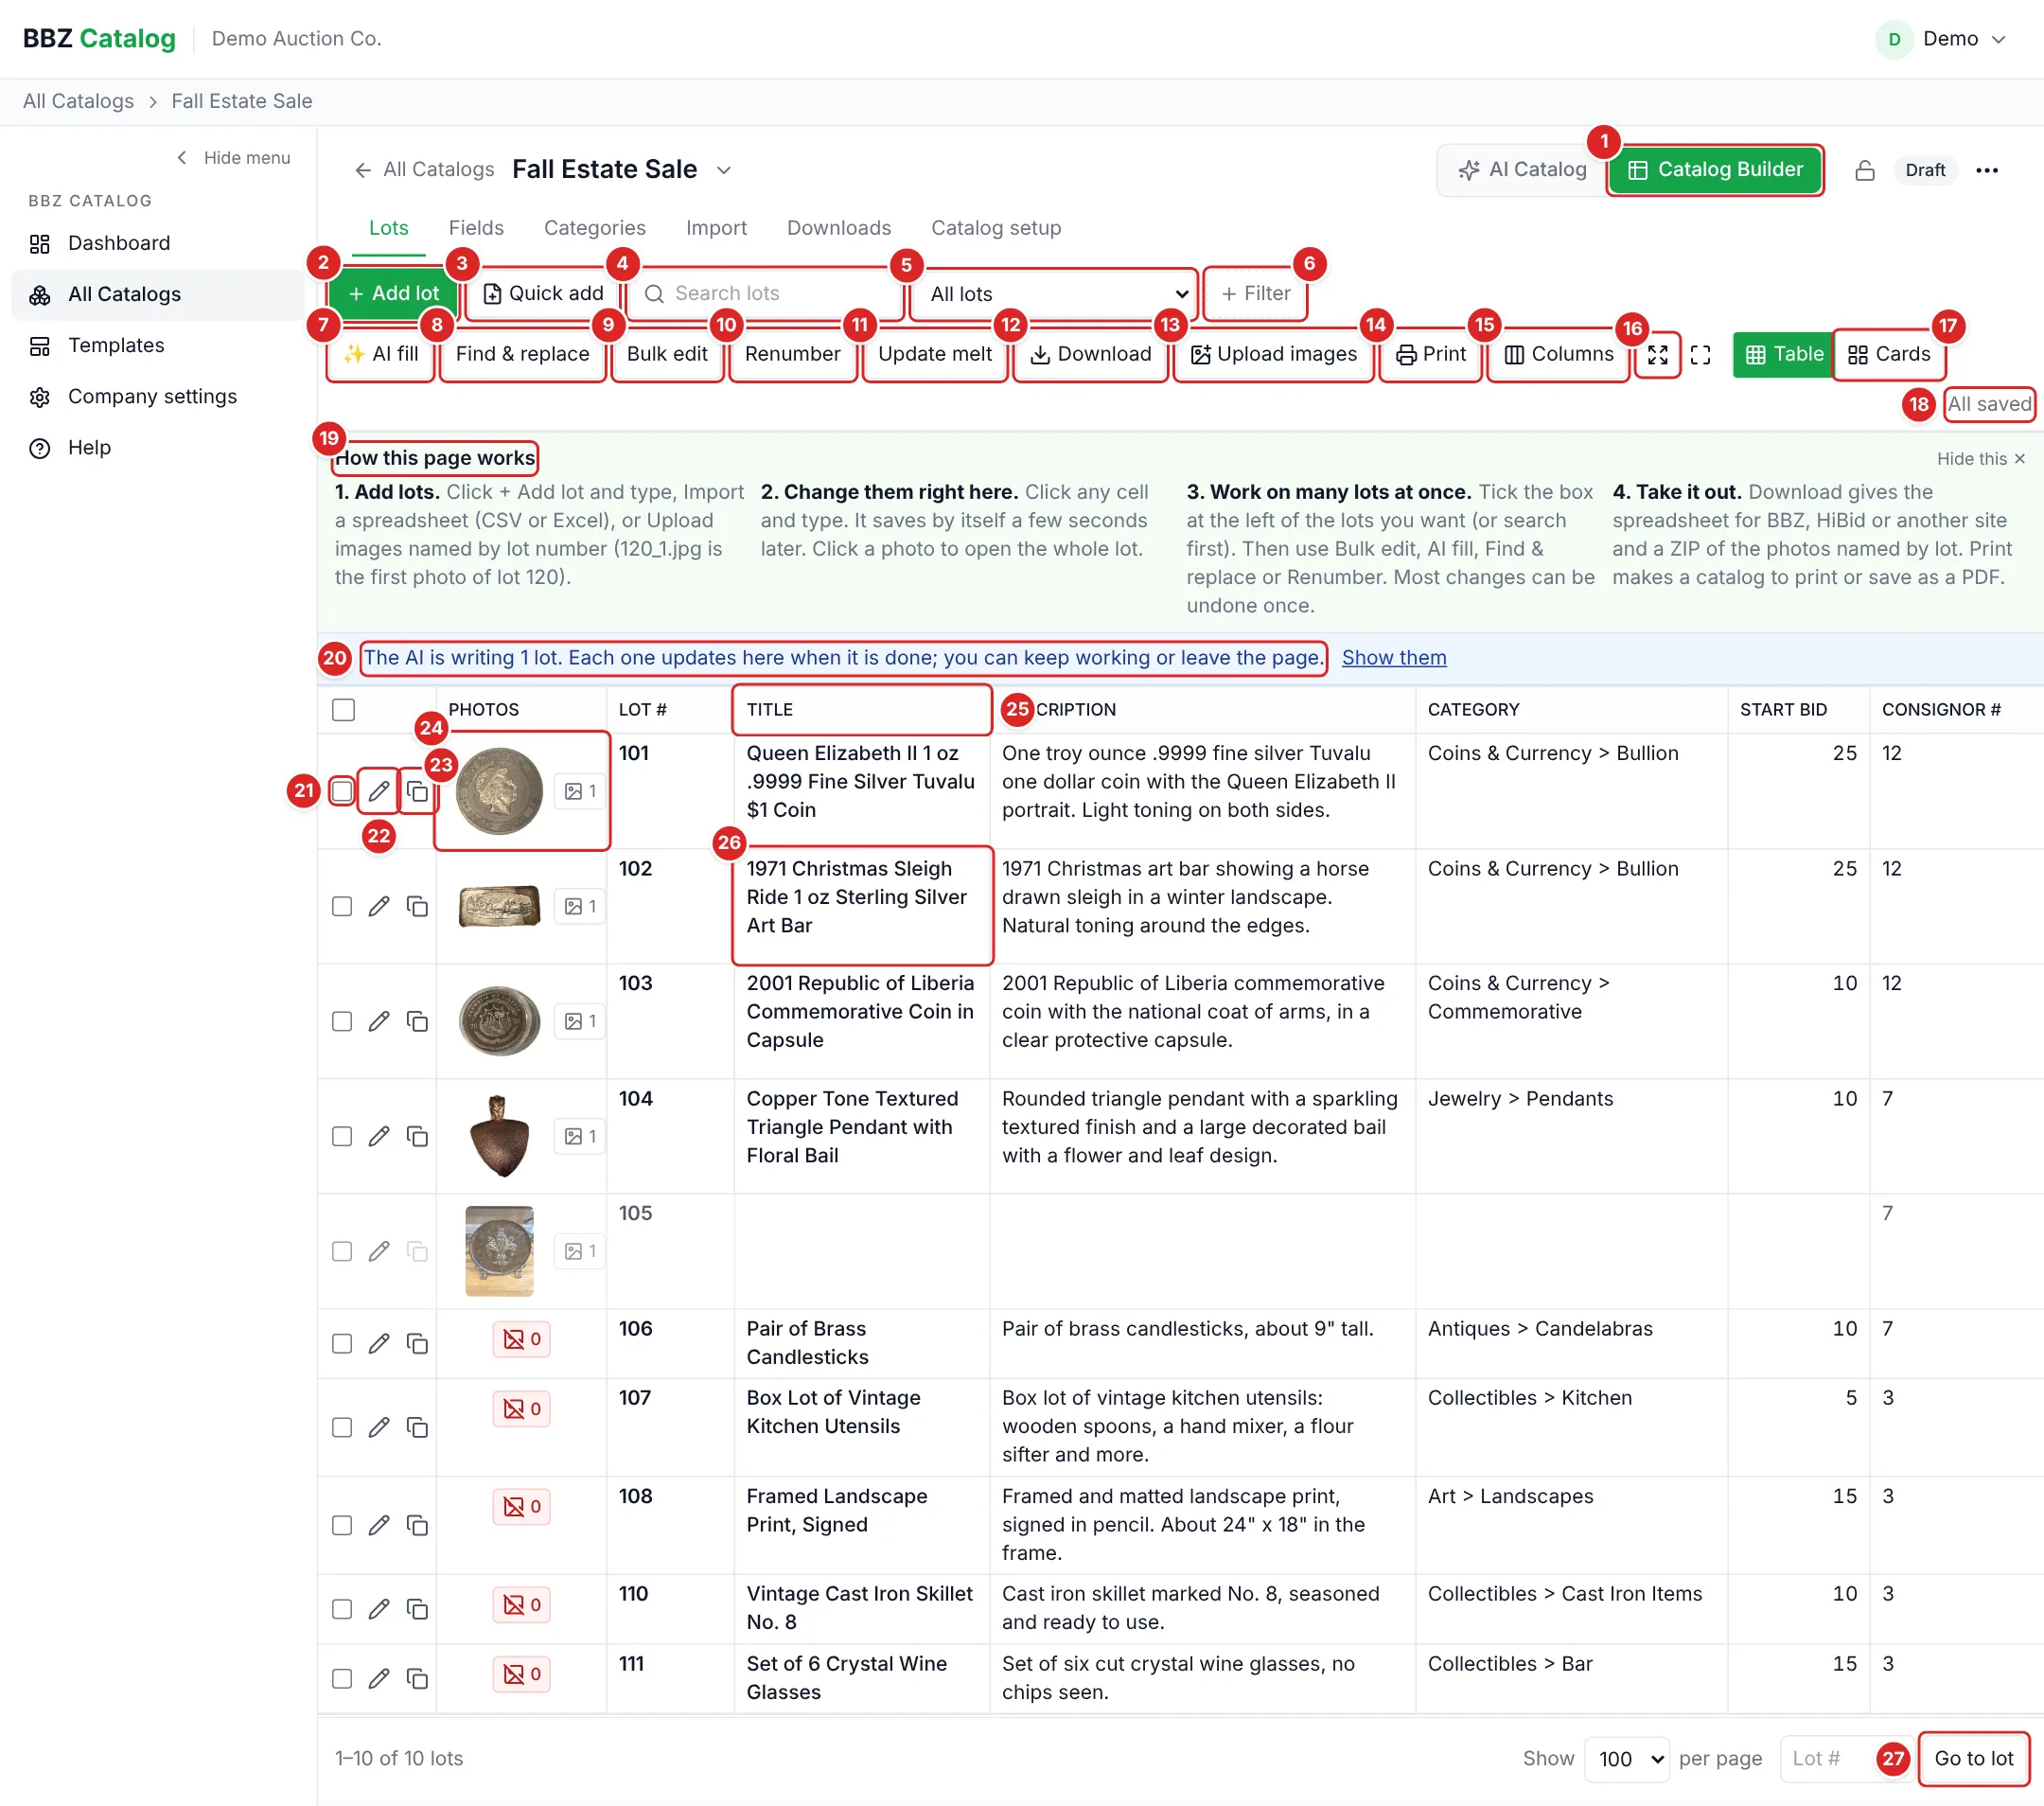
Click the picture to see it full size.
- 1Catalog Builder - the table view of the catalog (AI Catalog is the other view of the same lots).
- 2+ Add lot - a new lot with the next number at the end.
- 3Quick add - a New lot # box on the page you are on, with the open lot numbers to pick from (Ctrl+Enter). See the Quick add guide.
- 4Search lots - any word or lot number.
- 5All lots - ready-made filters: Title empty, No photos, Has photos, Photos no AI yet, New photos since the AI, Flagged, With the AI now, AI failed, Not approved yet, Hidden from public …
- 6+ Filter - your own filter: any field contains, is empty, is more than …
- 7✨ AI fill - the AI writes the ticked lots, the lots found, or all lots: only the empty fields, or every field. Each lot’s new text shows in its row as it finishes.
- 8Find & replace - change a word or phrase on many lots (you see the changes first).
- 9Bulk edit - the same Consignor #, Category, Start, Ship … on the ticked lots.
- 10Renumber - new lot numbers in order (photo names change with them).
- 11Update melt - melt values again at today’s gold and silver price: the ticked lots, or every coin lot. No AI.
- 12Download - the spreadsheet for BBZ, HiBid and other sites, and the photo ZIP.
- 13Upload images - photos named by lot number; lots that do not exist yet are added. Here it only uploads: use AI fill to have them written.
- 14Print - a printable catalog (choose Save as PDF for a PDF).
- 15Columns - which columns show, and their order.
- 16Wider and full screen - hide the side menu, or use the whole screen.
- 17Table / Cards - Cards is the phone view.
- 18Save status - All saved, Saving …, or what could not be saved (for example a price that is not a number).
- 19How this page works - a short guide; Hide this closes it.
- 20Notices - blue while the AI writes lots (a message says when it is done). Yellow when lots have photos but no AI yet, or new photos since the AI wrote them: Show them, then Send them to the AI.
- 21Tick box - tick lots to work on many at once. Shift-click ticks a run of lots.
- 22Pencil - opens the lot in the panel on the right (see the lot panel guide).
- 23Copy - a copy of the lot, with its photos, as a new lot.
- 24Photos - click the photo to see it large; the count opens the photos to add, order or delete.
- 25Column heading - click to sort; drag its right edge to make it wider.
- 26A cell - click and type. Tab moves right (from the last field to the next lot; past the last lot it adds the next lot). Enter moves down. Esc puts back what was there. Leaving a lot saves it.
- 27Per page and Go to lot - how many lots a page shows, and jump to a lot number.
Many lots at once
Tick the lots (the box at the left of each lot). A bar with what you can do to all of them appears above the table.
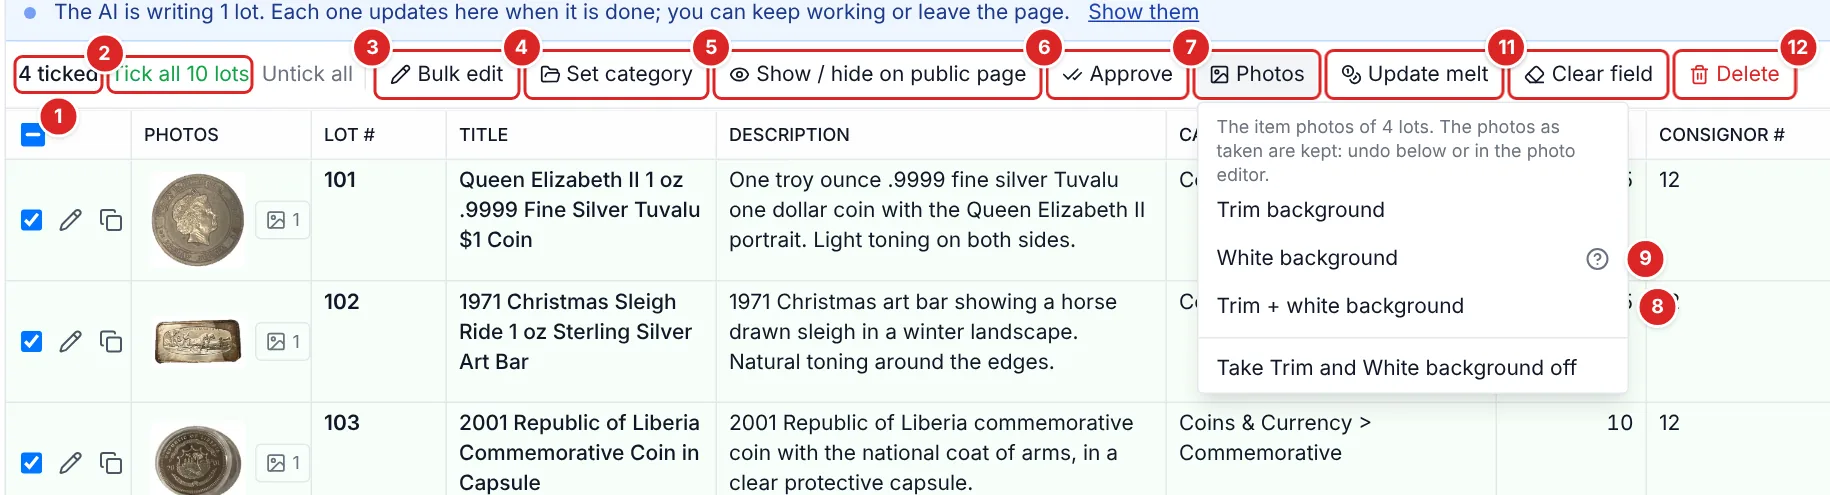
Click the picture to see it full size.
- 1Ticked - how many lots are ticked.
- 2Tick all / Untick all - tick every lot found by the search or filter.
- 3Bulk edit - the same values on all ticked lots.
- 4Set category
- 5Show / hide on public page
- 6Approve
- 7Photos - Trim background, White background, Trim + white background, or take them off again, on every item photo of the ticked lots. Done in the background; the photos change by themselves.
- 8Trim + white background - whitens the backdrop first, then trims to the item.
- 9? - when White background works and when it does not.
- 10Update melt - the ticked coin lots.
- 11Clear field - empty one field on the ticked lots.
- 12Delete - the ticked lots and their photos (it asks first).
Quick add
Quick add (or Ctrl+Enter) opens a box on the page you are on, with the lot numbers that are still free.

Click the picture to see it full size.
- 1New lot # - a free number is suggested: the first one after the lot you were on. Type another if you like.
- 2Add lot - the lot goes in its place by number and its Title opens for typing.
- 3Open on this page - the free numbers among the lots on this page; tap one to use it.
- 4Next after the highest - the number after the last lot.
- 5All open numbers - every free number in the catalog.
The lot panel
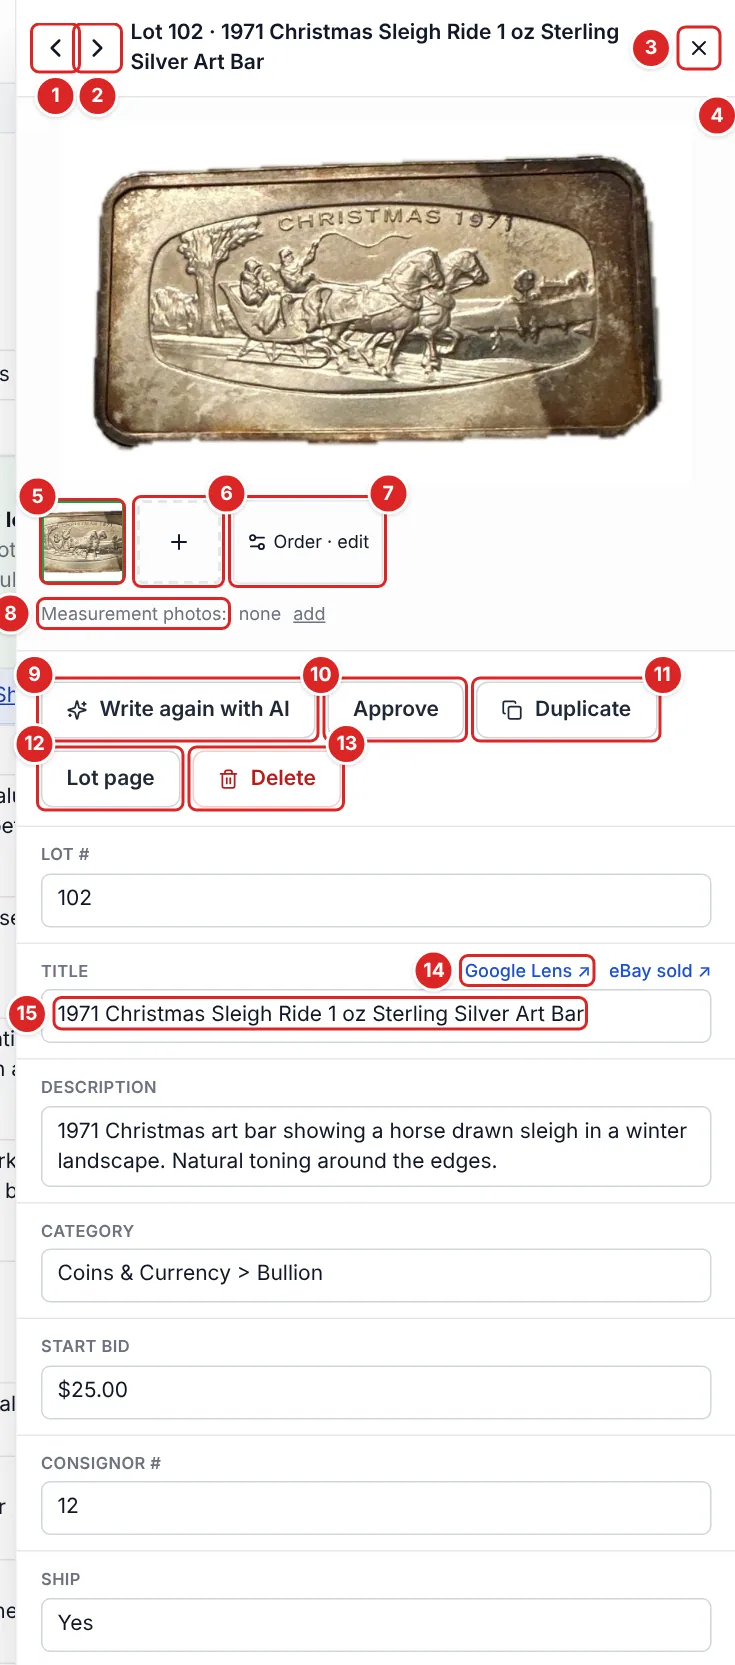
The pencil at the left of a lot (or its photo) opens the lot on the right, with its photos and every field.
Click the picture to see it full size.
- 1‹ Previous lot - ( [ key )
- 2Next lot › - ( ] key )
- 3Close
- 4Main photo - click to see it large.
- 5Photo strip - click a photo to show it. On a computer, point at it for Make main, Turn and Delete.
- 6+ - add photos.
- 7Order · edit - change the order, turn, delete or edit the photos.
- 8Measurement photos - add a photo with a tape or ruler; the AI reads the size.
- 9Write with AI / Write again with AI - the AI writes this lot from its photos (it asks first when that replaces text).
- 10Approve
- 11Duplicate - a copy of the lot with its photos.
- 12Lot page - the lot on its own page.
- 13Delete - the lot and its photos (it asks first).
- 14Google Lens and eBay sold - look the item up.
- 15Fields - click any field to change it; it saves by itself.
The photo editor
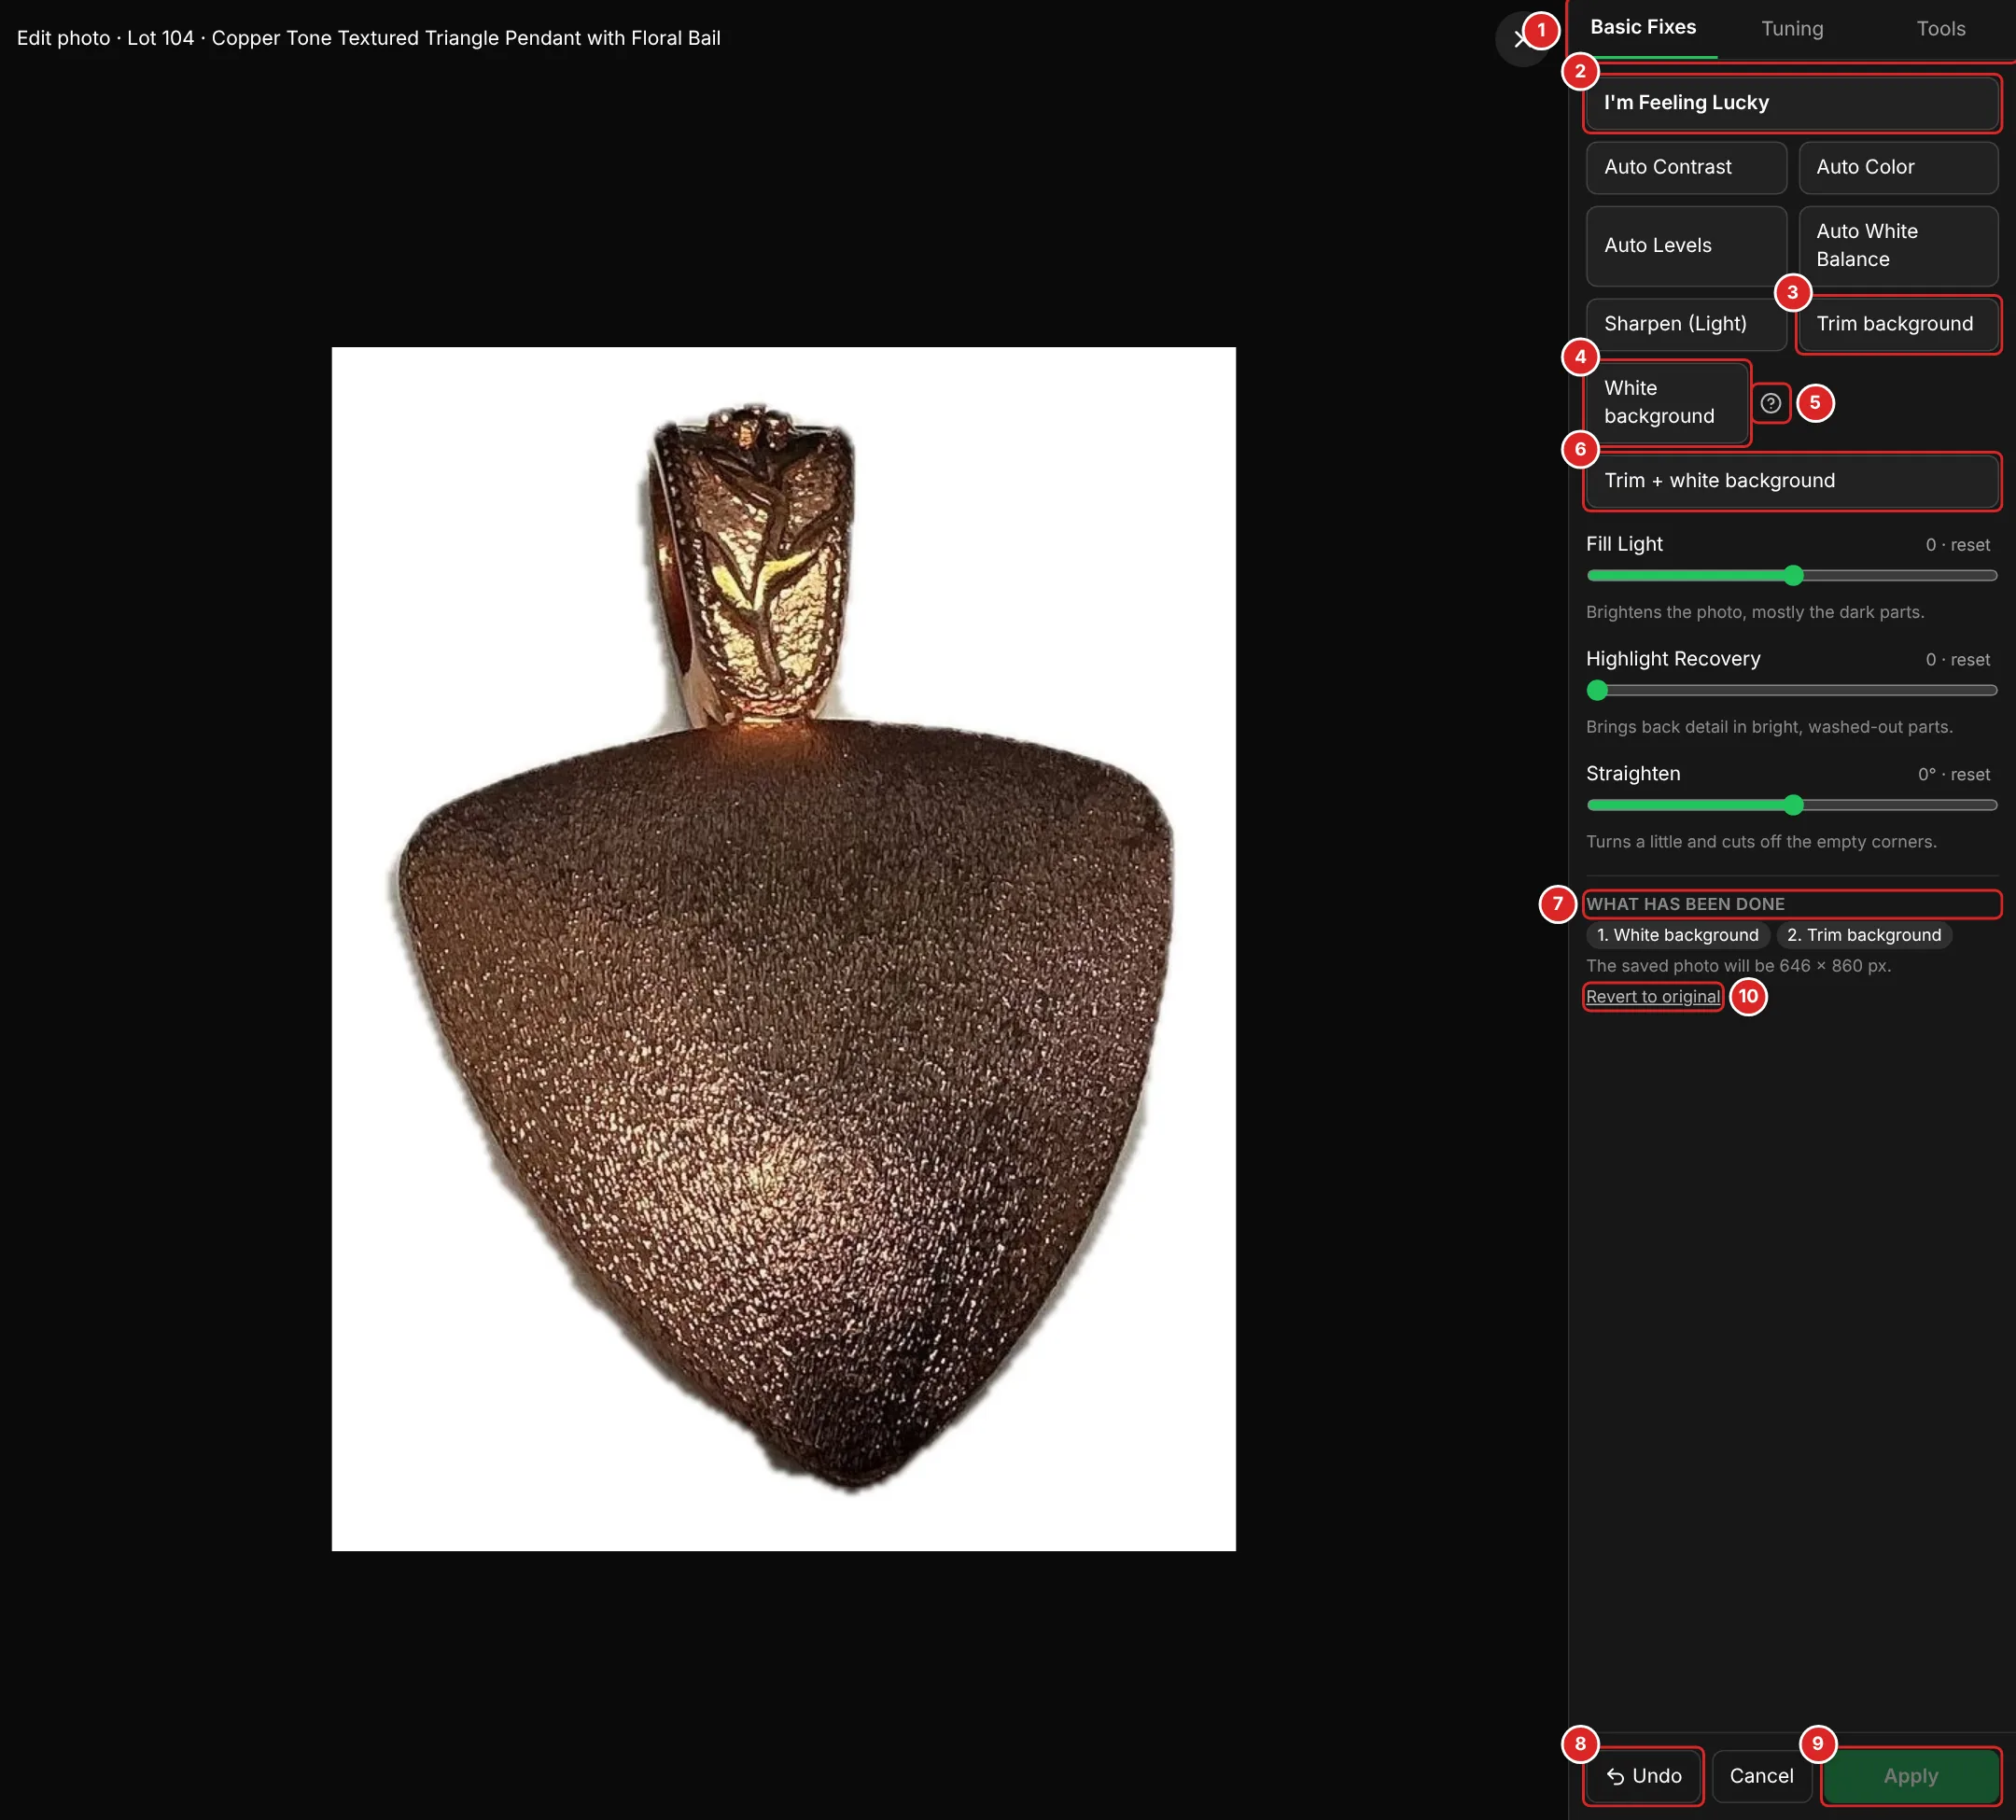
Click a photo to see it large, then Edit. Nothing changes until Apply, and the photo as taken is always kept.
Click the picture to see it full size.
- 1Basic Fixes, Tuning, Tools - Tuning has sliders (exposure, contrast …); Tools has Crop, Rotate, Flip and De-blur.
- 2I’m Feeling Lucky - a quick all-round improvement.
- 3Trim background - cuts the plain backdrop around the item.
- 4White background - makes the plain backdrop pure white and takes away its shadow.
- 5? - when White background works and when it does not.
- 6Trim + white background - White background, then Trim.
- 7What has been done - each step, in order.
- 8Undo - the last step.
- 9Apply - saves the photo. Cancel leaves it as it was.
- 10Revert to original - back to the photo as taken (the original is always kept).
Try it on your next sale.
The catalog program is free. No card needed.